
**Post updated March 2020**
With the passing of a beloved aunt a few months ago, I acquired a box of old family photos that she had stashed away. As I went through them they brought back fond memories of my childhood, and a small amount of horror as I saw a few of my hideous hairdos through the years – pixies and perms? Ugh! I also ran across old wedding photos of my aunt and uncle, pictures of my dad as a kid, others of my grandparents and great aunts and uncles, as well as pics of the many cousins in my large family. This got me thinking…all these photos just sitting in a box, with family members getting older, memories fading. Pretty soon there may not be many elders around to explain just who is who in certain photos and reminisce about “the old days.” So I started thinking about making a genealogy photo book, sort of a family tree book.
Also known as a heritage album, this is essentially a history book of your family. It tells the story of your family in words and pictures, going back as many generations as you wish. Putting together an ancestry book is no easy task, though, and you may feel paralyzed about where to begin. Here are my suggestions, based on what I learned as I went through the process.
1. Start by gathering as many old photos and slides as you can
Ask family members to help by contributing their own photos. Don’t forget pictures of the house your dad grew up in, your grandparents’ wedding photo, family reunion pictures and other important life events.
2. Compile Printed Material
Newspaper clippings, family recipes, marriage certificates, school report cards, diplomas, your mom’s kindergarten finger painting, and old letters would all make great additions to your book. For instance, if you have old letters from your grandfather or great grandfather that they wrote home during WWII, you could scan them and include excerpts.
If you have family heirlooms you want to include, you could take photos of the item. For instance, my dad’s mother made beautiful quilts. I can take a picture of one of them to include in my book. If your dad or grandfather has a war medal, you could take a photo of it as well.
3. Identify the images
As you begin gathering material, using a photo-safe pen to gently write names, dates and other important details on the back of the images. Sort them by family or person, theme or time period, depending on how you plan to make your book.
4. Scan everything
When you have gathered all your photos, clippings, letters, etc. the next step is scanning them. You can either scan them at home or outsource to a photo service. I like using Scan Digital because they’ll clean them, and hand-correct them using Photoshop to fix fading, minor scratches and those odd blue, red, or yellow color casts old photos can get. Then they’ll send you your digital images on DVD. Trust me, it’s much easier to outsource this part so you don’t get bogged down in minutia. You will be busy enough creating your book. If this is just not affordable or practical for you, take pictures of the photos and ephemera with your camera.
All this seems like a lot of work. Why not just use the originals and make a scrapbook album? That’s a good question. Traditional scrappers may prefer using the originals and placing them in clear, acid-free memorabilia pockets. But I prefer scanning the originals and using the digitized images in my book for several reasons. First, over time the originals fade and yellow. They are already old, and they will continue to deteriorate as time marches on. I want a heritage book that will last forever, and by having digital copies that I can back up, I know they will be safe. Second, after spending this much time accumulating photos, stories, and other memorabilia, I want to be able to share them with my family. I can easily do this by creating my book digitally and then ordering multiple copies. They would make great Christmas gifts for family members!
Ok, back to what else to include in your book.
5. Gather Personal stories
You want your genealogy book to tell your family’s story. The best way to get those stories is to interview elder family members such as grandparents, parents, aunts, and uncles. The best time to do this is as soon as possible because memories fade and elderly relatives may become memory impaired. Sadly, many people throw out old pictures because there is no one left to identify them.
Show your family members the old photos you’ve gathered and ask them to tell you about the people in the pictures – who they were, anything significant about their life, what they did. If possible, get several relatives together, it will help get the memories flowing. Get out your notebook and try to get as much detail as possible. Did your great-grandparents emigrate? Find out their story. How did they get to America? What did they do when they arrived? You may also want to explore genealogy sites such as ancestry.com or familysearch.org to dig deeper into your ancestors.
Family Recipes
My maternal grandmother passed away some years ago but I will never forget what a great cook she was. I will always remember a bunch of us sitting around her kitchen table eating her apple or rhubarb pie. So for my family history book, along with my favorite photos of her I want to include her rhubarb pie recipe. In fact, that’s another idea for a family book. You could ask members to send you their favorite recipes and make a special cookbook. If you can get your hands on your grandma’s original, perhaps handwritten, recipes, what great additions they would make.

Organizing Your Book
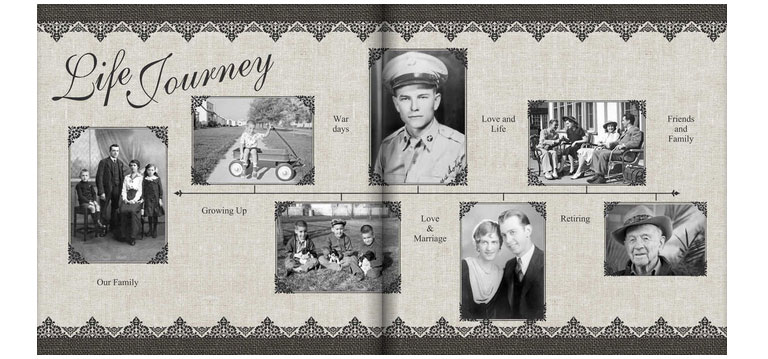
This can get a little tricky. I think the best way to organize your book is by giving each family its own section and structure in chronological order. Don’t try to combine different branches of the family, it will be too confusing. You could feature a page on each person with their name, birth date, accomplishments, a quote, a favorite memory about them, etc. If you have a large family, this may get a bit complicated, so don’t feel like you have to put everything in one book. You could make multiple books, one for each branch of the family, or generation, whatever best fits your needs.

Page Layout
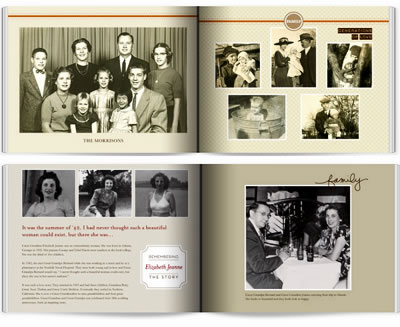
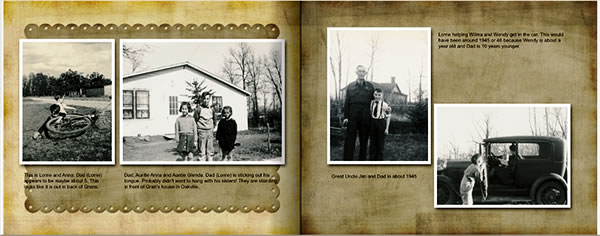
Begin a page by deciding which images you want to use. The page might revolve around a specific person or event. I recommend sticking with three to five images on a single page. There may be times when you only want one image and you want to use the remaining space for text to tell an anecdote or the person’s story. If you are illustrating a special event, you may want to make it a two-page spread and use five to seven pictures. Remember that just because you have seven photos of an event doesn’t mean that you have to use them all. If you have a choice, only use the best images and disregard any that are out of focus or badly damaged.
Journaling
This is a key step and it will make your book extra special. For each photo or page, create a text box in your photo software or online book editor and write down the name of the person, when the picture was taken if known, what event the image depicts, and what is significant about it. Of course, there are many other things you can include, such as anecdotes, favorite memories, poems, their favorite recipe, or whatever else is significant about that person.
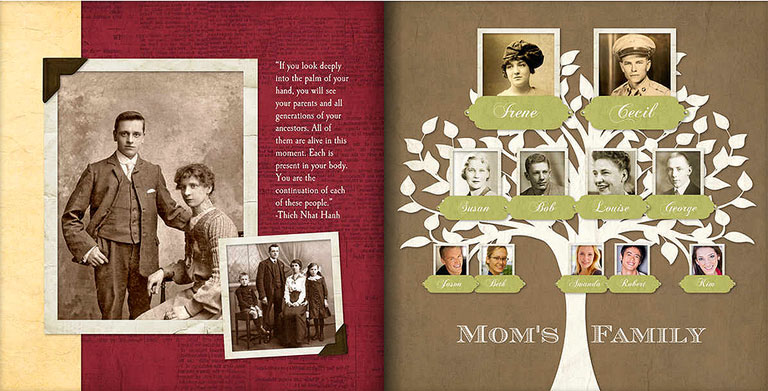
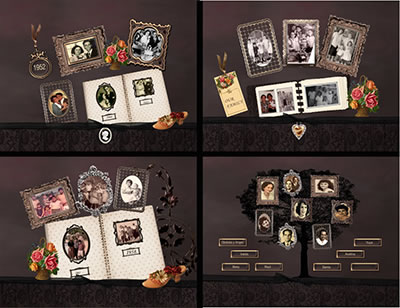
Genealogy – Your Family Tree
I like the idea of starting my book with a family tree. It is a good way to get organized and will help you lay out the rest of the pages. You can show your family tree with small photos of the individual and their date of birth and death, if applicable. I have a big family, there were 13 kids in my dad’s family and seven in my mom’s. And that is only one generation! When it gets down to the current generation, I may need to resort to just listing names and birth dates or I will end up with a 10-page family tree!
Mixbook has a couple of family tree layouts that you can customize. The one from A Book of Remembrance is pictured below.
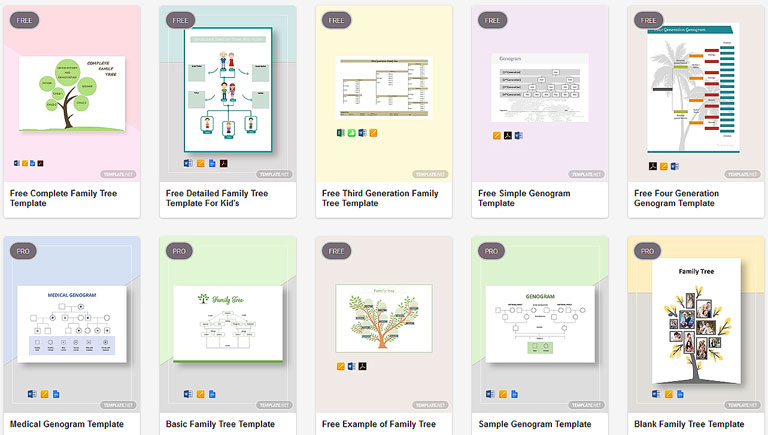
Free Family Tree Templates
Not all photo book templates have family trees. You could either create it in a program like Photoshop Elements or hand-draw it on paper and take a photo of it.
Even easier, you have a good chance of finding a suitable family tree template for your project at Template.net. They offer 70+ family tree templates. Their templates look really nice with a variety of styles that you can download in just about any file format (Adobe – Photoshop, Illustrator, InDesign, PDF Microsoft – Word, Excel, Publisher, Powerpoint, WordPress & HTML, Google Docs). You can customize them, print them or use them on the web. Many are free, some are paid. Below are some examples.
If you want to print the family tree template in your photo book, you could edit the template in Photoshop or Photoshop Elements to add your relatives, etc. and then save it as a JPEG. Upload it to the site where you’re making your photo book like any other image and insert it as a full-page photo.
Back-Up Your Book
I can’t stress this enough. There have been non-stop fires in various states across the U.S. in the last year and even if houses survive the flames sometimes they’re lost in the floods that have followed. It’s not enough to have a copy on an external hard drive because it can either get damaged, destroyed or it could malfunction. Make sure you don’t risk losing all your hard work and family memorabilia. Save a copy of your family heritage book in the cloud, either in something like Dropbox or via a scheduled backup program such as Carbonite. Take photos of printed memorabilia and store copies in the cloud as well.
Family Heritage Templates
To make it easier for you, I recommend using a photo book company that offers family history predesigned themes that you can customize. I found some nice ones at these companies:
Mixbook – has Family Yearbook and Family History themes; both have different family tree page layouts, as I mentioned. There is also an Our Story theme.
Shutterfly has two family heritage themes – Family Memories and Family Story (a premium book that will have a $4.99 upcharge). They also have several tribute themes: Someone Special and a Life Story (premium theme).
Picaboo – There is a Photo Album and Photo Journal theme that would work nicely for a heritage album. Picaboo also has sets of vintage-looking backgrounds including Vintage Wallpaper, Always on My Mind, Ancestral Rose, A Sunday Smile, Colonial Tapestry, Vintage Floral, Ancestral Rose, Natural Elegance, and Amelie. My book uses the Natural Elegance background.
Presto Photo – Presto Photo also has some very attractive templates such as the one below, called Our Family Genealogy.
You’ll find creating your family history photo album a rewarding experience as you learn more about your ancestors. As you are gathering background info, you’ll likely talk with, text or email cousins and other family members that you may not have seen or spoken with for a long time. This is a big project, but my guess is you’ll enjoy the process.
To help defray my website operating costs I belong to several affiliate programs. In some instances, I may receive a small commission for products viewed or purchased via my referral. Opinions are solely my own and I try my best to write honest reviews and only recommend products I would use myself.
Thanks so much for all this information! It is very helpful.
Hi All,
Just an enquiry as to how much it will cost me to order books for Family and Genealogy Photo?
Or any price lists you have for your books. I will also be needing 20 books altogether if possible.
Thank you,
Tangi
Tangi, you would need to check directly with each photo book company. I can tell you that there are always sales, so you can usually get a pretty good deal. Some may also offer a special price for multiple copies. I’ve got a deals page where you can check for the latest sales. http://www.photocoupondeals.com/weekly-promos/ Mixbook and Picaboo offer specials quite often, in fact Picaboo sometimes has a buy 1 get one free offer. Hope that helps.
I am so glad to find this site! I am going to make 3 Family Heritage albums for my children for gifts.
That’s great, Sharon. That’s something your kids will treasure.
Valerie
Great info and thanks!
I have done many of the organizational steps you suggested and I am ready to scan the pictures and articles I want to use! I am having a terrible time with my pictures!
I have been taking a picture of the old picture with my iPhone camera and then uploading my google photos to my computer. It gets on the computer but they are Nancy Brelandbeautiful albums that do great on google photos but when I try to add the photo to the book page, I am hunting through nearly 1900 photos!!
ANY SUGGESTIONS?
Hi Nancy, I suggest you use something like Lightroom Classic or Photoshop Elements to organize your photos by tagging them with keywords. In Lightroom you can also put images in collections, which are like virtual folders, to help you organize. You can get a free trial from Adobe. Here are links to a couple of Lightroom tutorials I’ve done on keywording and collections.
Collection: https://youtu.be/X6QIb_ruT8M
Keywords: https://youtu.be/hegp3eclHUY
Getting your photos organized before you start dropping them into your photo book will help enormously and save you a lot of time. Good luck!
Thanks for the review of the programs out there. I have already scanned close to 9000 photos and have them filed by surname. The family tree now has a little over 2000 names. I am a little overwhelmed on where to go from here. Will enjoy investigating your software reviews for making the books. (one for each surname).
Thank-you