There are dozens of sites that offer reviews of Adobe Photoshop Lightroom Classic, so in this post, I’m going to tell you why it’s my favorite tool for organizing and processing my digital photos. While Photoshop is awesome, I find that at least 90% of the time I never need to go into Photoshop to edit or retouch my images, I can do everything in Lightroom Classic.
One thing I need to clarify: Adobe has made things a bit complicated by adding new products and changing names around in the last several years. The software I’m talking about here is now called Lightroom Classic. This is the desktop version of Lightroom that’s been around for many years with lots of upgrades and new features. There is also Lightroom Mobile and the more streamlined, cloud-based Lightroom that works across desktop, mobile, and the web.
Nondestructive Editing
If you’re new to Lightroom Classic, it works a bit differently than other software like Photoshop, Photoshop Elements, Corel Paintshop Pro, and other traditional image editing programs. Lightroom is catalog-based, which means any changes you make to an image are recorded as data to the catalog and your original image is never touched. All the adjustments you make are stored as data, not as pixel changes as with Photoshop or other pixel-based software. I love this because this means it’s non-destructive editing. I can never accidentally overwrite an image and I can always get back to the original, untouched version if I want to.
Unlimited Undos
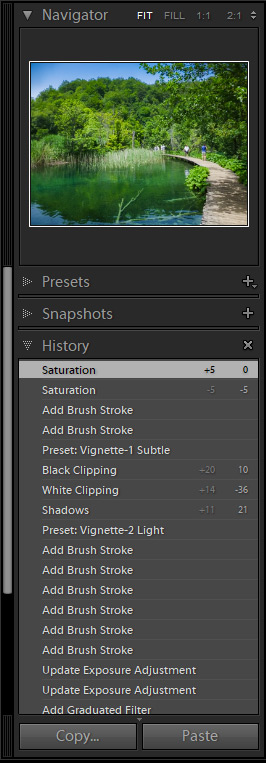
This is something else I love. You get unlimited undos. In fact, using the history panel I can go back to any stage in the editing process, at any time. Unlike in Photoshop, where you lose the history that’s stored in the buffer when you close the program, the full history of your image in Lightroom is always available, a day, a month, or a year later because it’s stored in the catalog as data. If you make 500 or 1000 adjustments and want to go back to the 50th, or the 2nd, you can.
Easy, Logical Workflow
So what can you do in Lightroom? The software is composed of seven modules: Library, Develop, Map, Book, Slideshow, Print, and Web and you can easily move from one to the next.. The ones you will use most often will be the Library and Develop Modules.
Powerful Image Management System
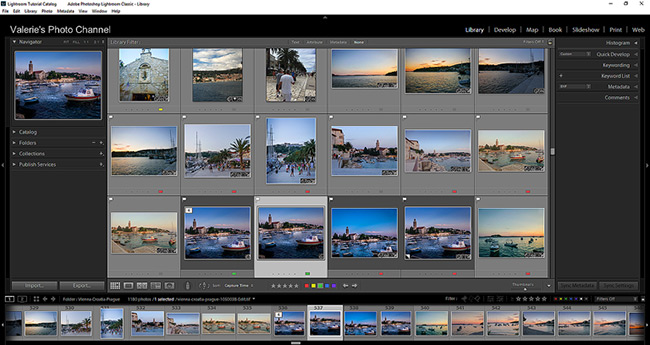
The library Module is where you import, organize, manage, keyword, and rate your images. Lightroom has powerful image management capabilities. The catalog works by creating a link or an association to your image wherever it’s physically located on your hard drive, you aren’t actually “importing” or moving images.
Collections
This is a great organizing tool in the Library. You can create collections of images; they are virtual, you’re not actually moving them around and you can have the same image in multiple collections at the same time. This is an extremely useful feature that really makes organizing easy. Collections are the way to go, you don’t need to touch your folders.
Virtual Copies
Want to experiment? You can make a virtual copy of your image and try out different things and still have your original to compare it to. The copy is stored as data so it’s not taking up a lot of additional space on your hard drive. You can experiment with different effects and still have your original.
Sharing
From the Library, you can post images to social media and photo-sharing sites like Facebook and Flickr. Online comments and Likes about your images are can be seen within Lightroom. I think a lot of people don’t realize you can do this.
Easy Adjustments
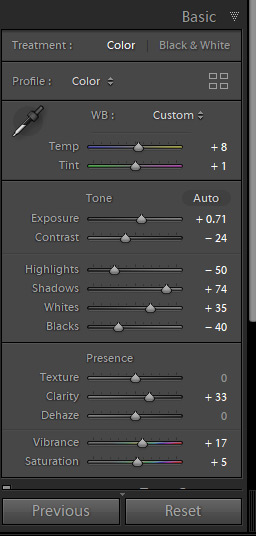
The Develop Module is where you make adjustments to your photos. This is where all the magic happens. Lightroom is designed for processing raw files, though you can also edit and enhance JPEGS as well. Pictured at left is the Basics Panel, where you make White Balance and Tone adjustments as well as changes to the Clarity and Saturation simply by moving the sliders. Cool, huh?
Recently Adobe added a Texture slider that you can adjust to increase or decrease the amount of “texture” in an area without losing fine detail. It works great with hair and on foliage in particular. It’s also very useful when editing portraits; by sliding it to the left you can soften skin yet still have a subtle look.
HDRs and Panoramas
A couple of years ago Adobe added HDR and panorama image processing right in the Develop Module, instead of having to go over to Photoshop. That’s a really big improvement and a time-saver.
Integrated with Photoshop
Incidentally, that’s a cool thing you can do: jump over to Photoshop right from Lightroom. Although you can do most of your post-processing and retouching inside Lightroom, there are occasions when you still need to do something in Photoshop, such as a composite image on layers, or to change the background or complex retouching. You can get to Photoshop from inside Lightroom, make your adjustments, save the image and it opens back up in Lightroom (as a TIF or PSD file). This is super handy.
Local Adjustments
You can use local adjustment tools like the Adjustment Brush, Radial Filter, or Graduated Filter to make area-specific adjustments. For example, you can use a Graduated Filter to make the sky bluer or with the local adjustment brush soften wrinkles or create special lighting or color effects in certain areas. The Cloning and Spot Removal Brush will fix blemishes and under-eye circles, and remove a garbage can or other unwanted object.
Other Modules
Aside from the Print Module, these other modules are not used anywhere near as much as the Library and Develop Modules, though they certainly offer some conveniences.
Print gives you options for printing your images on your own printer or adjusting settings to export them for printing online. Soft proofing lets you preview how an image will look when printed. It changes the image background to white and shows colors based on the output device.
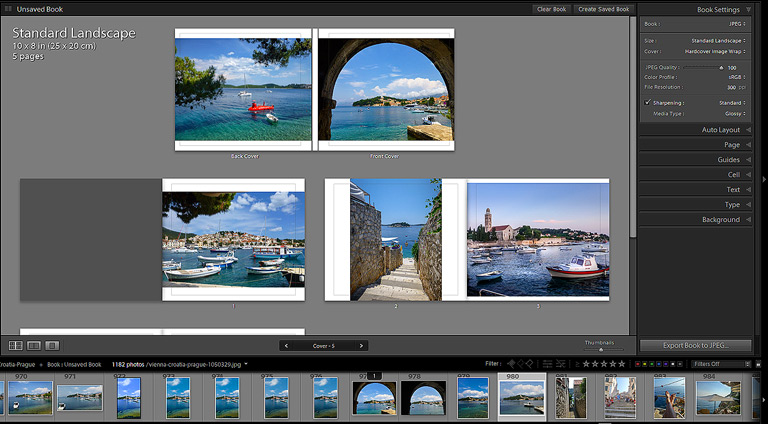
Book Module – you get photo book creation and printing via Adobe’s partnership with Blurb. You can design your own layout or use the Auto layout. You can either upload them to Blurb for printing or export them as JPEGS to another photo site. This module I have to put this under “I Wish I Loved It.” I do like the concept, but Adobe has not spent much time adding new features and you’re limited in the book sizes and to using Blurb for publishing. While Blurb is excellent, many people would prefer having more flexibility in where they send their book for printing.
The Map Module offers location-based organizing via geo-tagging. If your camera is GPS-enabled, you can locate and group images by location and assign locations to images.
In Slideshow, you can create presentations, set cover images and captions, and add music.
Web lets you create HTML or Flash web photo galleries to upload.
It’s Easier Than Photoshop
I don’t want to make this a comparison of Lightroom vs Photoshop, but a real advantage of Lightroom is that it’s much easier to learn. Way easier. That’s not to say it’s a simple program, it’s not. But making tonal changes, white balance adjustments, sharpening, and other adjustments is pretty easy, you just adjust sliders left or right and see the changes as you move them.
As I said, while it’s not as difficult to learn as Photoshop, it’s important that you learn to do things the right way from the start. I’ve got a series of free video tutorials here that will help you get familiar with the Library and Develop modules and tools.
Speed Up with Presets
You can also apply Presets to your images, either on import or later in the Develop stage. This can be a big time saver. Presets are Develop settings such as contrast, exposure, saturation, highlights and shadows settings that have been saved so you can apply them automatically to an image to attain a certain look. You can also adjust the settings of presets to get just the look you want. I like to think of it as a good starting point. You can also create print, naming, and project presets. There are thousands of presets that you can download for little to no cost. Some of my favorites are by Serge Ramelli. You can get them here.
Creative Cloud Subscription Program
In the past, you could buy a standalone version of Lightroom Classic, but today Adobe offers only a subscription-based option with frequent feature updates. The monthly Photographers subscription also includes Photoshop and it’s $10/month for both. This is a pretty good deal to get the latest updates and features, and I find that it’s well worth the ten bucks a month. I like that the latest upgrades are included, so I’ll always have the most current version of both programs.
Have You Tried Lightroom Classic?
What do you think about Lightroom? Let me know in the comments below.
To help defray my website operating costs I belong to several affiliate programs. In some instances, I may receive a small commission for products viewed or purchased via my referral. Opinions are solely my own and I try my best to write honest reviews and only recommend products I would use myself.