Have you been thinking about trying Adobe Lightroom for your photos, but wondered if you should be using it or Photoshop, or something else for your image editing? I’ve been working in Lightroom for a number of years now and have come to rely on it so much that I can’t imagine not using it. It’s greatly sped up my workflow, plus it’s fun to use! Here are my favorite reasons for using Lightroom to manage and process my raw and jpeg images. If you’re not yet using it, hopefully, it will convince you to give it a shot.
1. Lightroom is Made Specifically for Photographers
Sure, Photoshop is awesome, but it’s got probably a zillion features that you don’t need as a photographer. Lightroom is a workflow-centered program built for photographers. Using Lightroom, you’ll have all the tools you’ll need to import, organize, manage, edit, and output/share your photos in a logical workflow.
2. No Need For Saving
If you’ve ever used Lightroom, you might be confused at first because there’s no “Save” button. That’s because the software automatically saves your edits to your Lightroom catalog. This is a database of your adjustments and the history of everything you’ve done to your images.
3. Unlimited Undos
Lightroom keeps track of every change you’ve made to your images and stores them in your catalog database. So you can go back 5 steps or 50 steps or more. You can open an image that you haven’t looked at in a year and in the History Panel you’ll see a list of all the edits you previously made and you can step back to a previous state with one click.
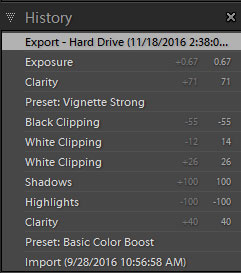
4. Non-Destructive Editing
The beauty of Lightroom is that your original image, whether it’s a raw file or jpeg, is never touched. All adjustments you make to an image are recorded in the catalog database as a set of instructions, they’re not made directly on your image like with Photoshop. When you’re satisfied you can export your photo with all of your adjustments “baked in,” but your original image remains unaltered.
5. Sync Changes Across Multiple Images
This can be a huge time-saver. For example, if you’re shooting a series of images in the same lighting, you just need to adjust one photo and then you can copy and paste the changes to a group of selected photos so all get the same adjustments in one swoop. Gotta love this.
6. Easy to Learn and Use
While there’s no question that Photoshop is still the gold standard when it comes to editing, it has a much steeper learning curve and can be quite overwhelming to beginners. Photoshop is pixel-based and you need to master working with layers to get the most out of it. In contrast, Lightroom is more intuitive and straightforward to learn. That’s not to say it’s not powerful, because it is!
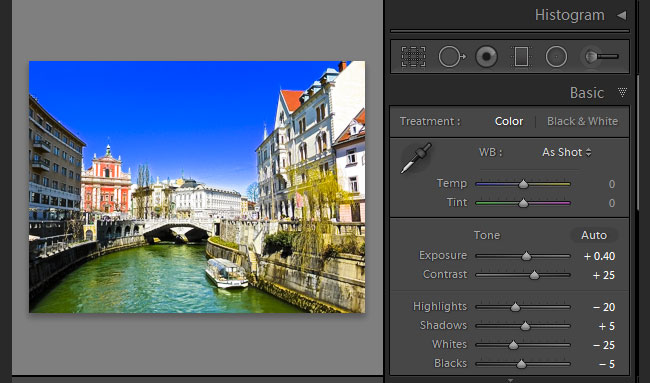
7. Simple Slider-Based Adjustments
In the Develop Panel where you do your editing, Lightroom has a series of sliders you can use to make adjustments, such as exposure, contrast, clarity, white balance, and others. If you’re just learning, you can use Lightroom’s Auto Adjustments to make what the software thinks are the best adjustments for the image and then use the sliders to tweak it further to your liking.
8. Make Local Adjustments
The adjustments brush allows you to make changes to a portion of an image without affecting other areas. The best thing is you can do this without working in layers, as you would in Photoshop. For example, you can lighten or darken a specific area, add clarity to rocks in the foreground without affecting the sky, and much more. You can control the brush’s intensity and where you want the adjustment. This tool is much simpler to use and understand than Photoshop Layer Masks, and for me, it’s a huge advantage and a major reason to use Lightroom.
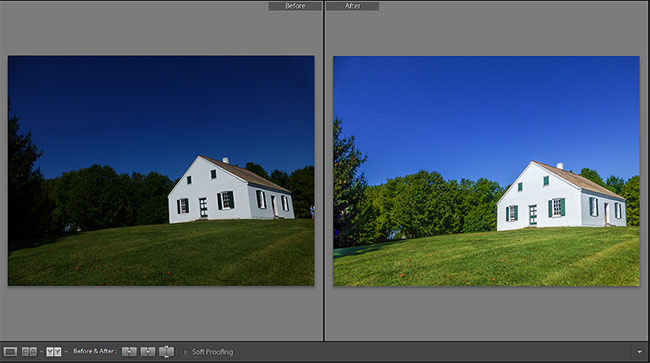
9. Compare Before/After Views
You can view your image in its current state with adjustments you’ve made and compare it side by side with the original version. There are options to view the images in portrait or landscape orientation or even choose to see a split version of one image where the left half of the photo is the “before” and the right half is the after.
10. Easy Keywording and Organizing
Lightroom’s Library Module is the main area where you organize and manage your images. You can add keywords to individual images or groups of photos, or use the Painter tool to quickly apply keywords to a group of selected images. You can even apply keywords and copyright as you import your photos. You can organize images into collections, and group them by date, ISO, camera type, etc.
11. Great Workflow Management
In addition to excellent developing/editing tools, Lightroom enables you to import, organize, apply keywords, manage, sort, and filter your images all in the same software tool. You can print photos, organize your photos into collections, create slideshows and web galleries, add geo-tagging, and even share to Facebook and Flickr right from the program.
12. Presets For Instant Adjustments
With just one click, you can use a preset to apply specific adjustments to an image or group of images. For example, if you adjust the contrast, clarity, and saturation sliders on a landscape photo to enhance the color and make it pop, you can record those slider settings as a preset to apply to other images. Lightroom comes with a number of presets but you can easily create and save your own. You can also find numerous free and paid presets online. You can use presets for importing and developing as well as exporting your photos.
13. Healing and Cloning
Most of the time you can do all your retouching right in Lightroom without ever having to move into Photoshop. Lightroom has tools for easily removing unwanted objects like blemishes and wrinkles, or that telephone pole in the background.
14. Unlimited Virtual Copies
A Virtual Copy is a way to create a different version of the same image, without making an actual, real duplicate and taking up more disk space. For example, you may want both a color and black and white version of the same image. That’s where Virtual Copies come in handy.
15. Lots of Printing Options
If you need to print your photos, Lightroom has numerous pro-level options. There are different page layout templates and options for different printers and paper sizes and types, color management, and more. You can customize the print options and save projects and templates for future use.
16. Numerous Exporting Options
Lightroom enables you to export your photos in a variety of formats. You can export for printing at a lab for the web in any size or resolution and in a variety of file formats. You can even use the Publish Services (found in the Library module) to export your images directly to social media including Facebook and Flickr.
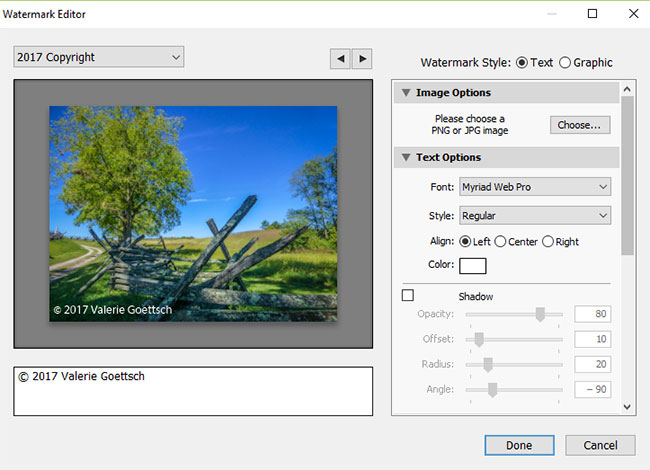
17. Watermarking
When you export your images, you can choose to create a custom watermark and have it automatically applied, which is a nice time-saver. There is a basic preset or you can customize both the content and the placement on your image.
18. You Can’t Accidentally Overwrite Your Original Photo
You don’t have to worry about accidentally overwriting your original image. As I mentioned earlier, everything you do in Lightroom is recorded as a set of instructions and automatically saved to your catalog. Because Lightroom is database-driven and not pixel-based, like Photoshop or PS Elements, there is no danger that you will accidentally save over your original.
19. Work from Multiple Computers
For the times you’re out on a photo shoot or on vacation, you can have a temporary “working” catalog on your laptop and then merge your images to your primary catalog when you are back home on your main computer. There are other ways to work with multiple computers, including Using Lightroom Web (for CC subscribers).
20. Geo-Tagging
Lightroom has built-in Google Maps, so if your camera has GPS Lightroom will automatically position your images on the Map module. You can organize your images by location, which is particularly nice with vacation or travel photos.
21. Create Photo Books
The Photo Book Module is an often-overlooked feature of Lightroom that’s downright handy. What I like is that you can design your whole photo book inside Lightroom via drag-and-drop, all ready for printing. You can upload it to Blurb, Adobe’s printing partner, or save your book as PDF or JPEG files to upload to another printing service.
I could go on and on, but I hope you are getting the idea. If you have any favorite features that I didn’t mention, please let me know in the comments.
Ready to try out Lightroom? If you want to get started, here are some resources for you:Free Lightroom Video Tutorials – I recorded a collection of YouTube videos that walk you through using Lightroom, from exploring the interface to importing and organizing your photos and editing/processing them. Best Books for Learning Lightroom – Here’s a huge list that I compiled with my favorite books for learning how to use Lightroom. Be sure to check out Victoria Bampton’s free Getting Started Guide. Digital Photography School Lightroom Mastery: People & Portraits – In this new online video course from professional photographer Mike Newton, you’ll learn all the Lightroom secrets the pros use to retouch portraits. Lightroom CC Complete Training – Serge Ramelli is a master of Lightroom and Photoshop and an awesome teacher. In 55 lessons you get over 6 hours of training through all the features of Lightroom. Lightroom Presets – You can give your photos that wow factor in one click using a preset. Here are my favorite high-quality presets. There are options to get the entire package or you can choose a specific collection. Get Adobe Lightroom – Adobe Lightroom is available as a standalone program for about $140, or you can subscribe to Adobe Creative Cloud Photography Program and get both Lightroom and Photoshop for about 10 bucks a month. I chose this option and it works very well for me. I like getting the latest updates (included) so my software is always current. |
I hope this article helps you understand what Lightroom does and how it can speed up your photography workflow. If you have any questions or comments, I’d love to hear from you!